Windows updates frequently bring about fixes for bugs, enhancements in security, and fresh functionalities to your computer system. However, there’s also the potential for them to go awry, causing issues such as reduced performance or even distressing data loss. If you happen to observe peculiar behavior subsequent to an update installation, it’s possible to revert the update in an attempt to restore proper functioning.
Two primary categories of Windows updates exist: Quality Updates and Feature Updates. Quality updates encompass security enhancements, bug rectifications, and other minor adjustments contained within the monthly “Cumulative Updates” visible on the Windows Update section within Settings. In contrast, Feature Updates are the more substantial, yearly updates that arrive bundled with novel features and significant alterations.
For Windows 10 and Windows 11 users, the capability to uninstall Quality Updates is available, while Feature Updates necessitate a reversion procedure utilizing recovery alternatives. Below, you’ll find instructions on the process of uninstalling a Windows update.
Enter Safe Mode
If a Windows update has triggered unusual behavior or disrupted the functionality of one of your peripherals, the process of uninstalling it should be relatively straightforward. Even if your computer seems to be functioning properly, it’s generally advisable to boot into Safe Mode before initiating the uninstallation process, as a precautionary measure.
To do this, follow these steps:
1. Open the Start menu and click on the Power button.
2. While holding down the Shift key, click on Restart. This action should trigger Windows’ recovery menu when your computer restarts.
3. If your computer is not starting up properly, you can force the recovery menu to appear by holding down the power button as the computer boots up. This will ensure the recovery menu is displayed the next time you power it on.
Once you’re in the recovery menu, proceed as follows:
1. Navigate to Troubleshoot.
2. Then go to Advanced Options.
3. From there, select Startup Settings.
4. Click on Restart.

After your computer restarts again, you will be presented with a list of options. You’ll need to press the appropriate key to enter Safe Mode. This key is usually F4 or F5, but it may vary depending on your system configuration.
By entering Safe Mode before uninstalling the update, you provide an additional layer of protection to ensure that your computer environment is stable and minimized chances of any unexpected issues arising during the uninstallation process.
Uninstall Windows Quality Updates
After successfully entering Safe Mode, Windows 10 users ought to navigate to Settings > Update & Security > Windows Update. From there, select View Update History to access a comprehensive list of recently installed patches. At the upper section of the page, you will find the Uninstall Updates link; clicking on this link allows you to initiate the uninstallation process.
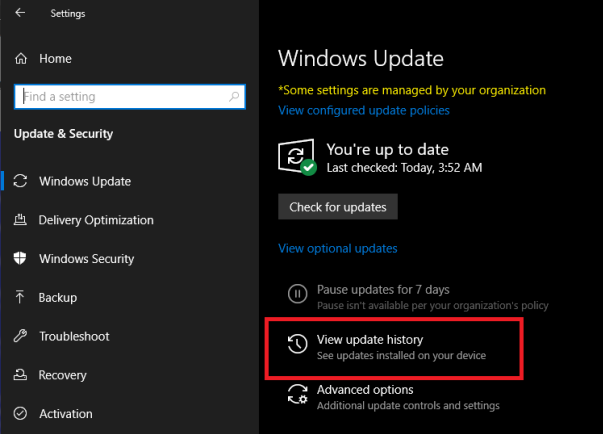
For Windows 11 users, once you’re in Safe Mode, follow these steps:
- Open the Settings menu.
- Click on Windows Update.
- Within Windows Update settings, select Update History. This action will display a list of recently installed updates.
- Scroll down to the bottom of the page.
- Click on Uninstall updates. This action will open a Control Panel window that showcases the recent updates.
By adhering to these instructions, you can conveniently access your update history and initiate the process of uninstalling updates on Windows 11.
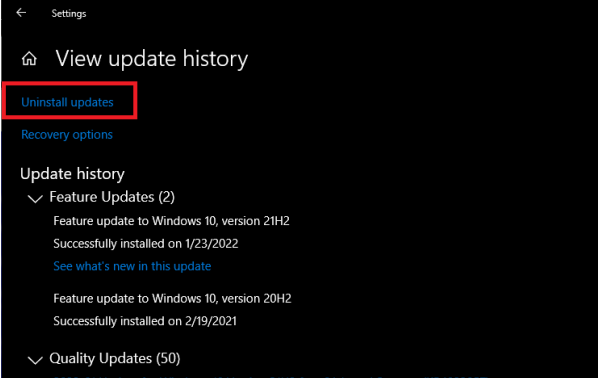
In case you are utilizing Windows 11, simply access the Settings menu, proceed to Windows Update, and select Update History. This will present you with an overview of recently carried out installations. Navigate to the lower section of the page and activate the Uninstall updates option, which will trigger the opening of a Control Panel window displaying the most recent updates.

Windows will display a roster of recently applied updates within the Control Panel interface. This list includes links that lead to more comprehensive descriptions of each patch, accompanied by the date on which you executed the installation. If you can recall when the issues initially emerged, the installation date can be particularly useful in identifying the specific update to be removed.
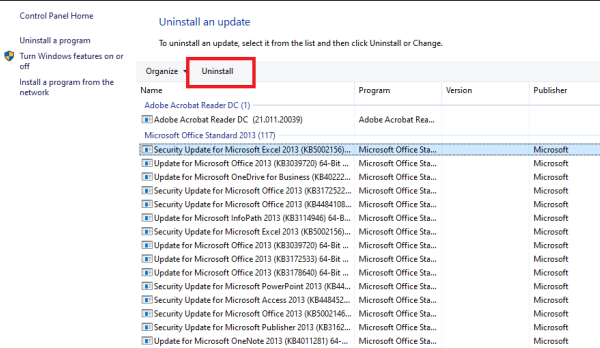
Choose the update you’re concerned about by selecting it, and subsequently click on the Uninstall button situated above the list. Disregard the Uninstall a program option visible in the sidebar. The removal process might take a short while, but once it’s completed, you can assess whether the issues you were facing still persist.
Please be aware that after uninstalling an update, it may attempt to reinstall itself during the next update check. To address this matter, you have the option to temporarily pause updates until the issue is resolved.
In the event that the Uninstall button does not appear on this screen, it’s possible that the specific patch is designed to be permanent, preventing Windows from allowing its uninstallation. While I’ve heard anecdotal accounts of unconventional methods that circumvent this limitation, I haven’t personally verified them. Alternatively, Microsoft suggests utilizing System Restore or a system backup to revert your computer back to a previous state.
Uninstall Windows 10 Feature Updates
Windows 10 Feature Updates are introduced on an annual basis. These updates undergo extensive testing across various hardware setups by Microsoft. Only after confirming compatibility with your system’s configuration are they released. However, despite thorough testing, issues can arise, prompting Windows to provide a rollback solution.
There is one important consideration: You have a window of 10 days within which you can uninstall a significant update after its installation. It’s crucial to take swift action if you suspect the update may have caused problems on your system. Beyond this 10-day period, Microsoft removes the previous files to free up storage space on your hard drive, and the rollback option is no longer available.
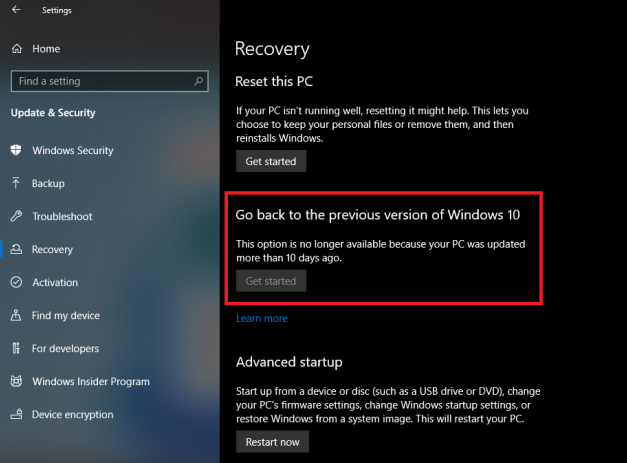
To initiate the uninstallation of a Feature Update, navigate to Settings > Update & Security > Recovery. Scroll down until you locate the option “Go Back to the Previous Version of Windows 10.” Click on the Get Started button to commence the uninstallation procedure.
In the event that the button isn’t active, there are a couple of possibilities to consider. It’s plausible that the 10-day timeframe for uninstallation has elapsed, or you might have deleted the previous files using Disk Cleanup, rendering the rollback function unavailable. Should you possess a system backup, this would be an appropriate juncture to utilize it.
Downgrade From Windows 11 to Windows 10
If you’ve recently updated to Windows 11 and encounter problems with the operating system, Microsoft provides a 10-day window for you to revert back to Windows 10, essentially undoing the upgrade. To proceed, follow these steps:
1. Open the Settings menu.
2. Navigate to System.
3. Within the System settings, choose Recovery.
4. Look for the “Go back” button and click on it.
Microsoft will inquire about the reason for your decision to revert and present an opportunity to update Windows 11 with the aim of resolving any issues. Follow the prompts in the wizard until Windows initiates a restart, at which point your previous Windows 10 installation will be reinstated.
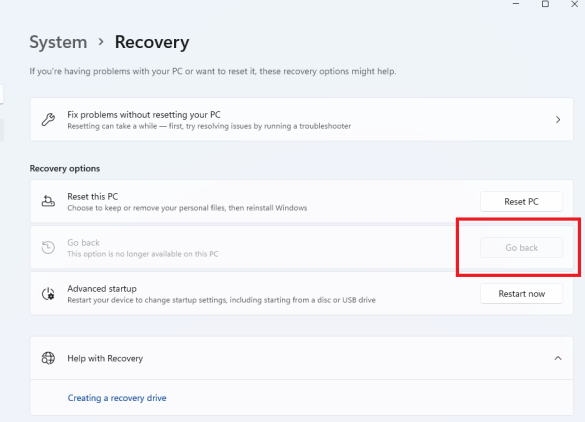
If the “Go back” button is not selectable, and it appears grayed out, it indicates that either the 10-day timeframe for the reversion has expired or you might have already deleted the previous files. In such a situation, the sole recourse available to you would be to restore Windows 10 through a system backup, if you have one in place.
If Your Computer Won’t Boot Into Windows at All
In scenarios where you’ve installed an update and are unable to boot into Windows, rendering you incapable of following the aforementioned instructions—even including Safe Mode—Windows typically endeavors to automatically revert itself. If this automated process proves unsuccessful, you have one remaining option prior to resorting to your system backup.
Follow these steps:
- As your computer is booting, press and hold the power button to turn it off.
- Power the computer back on.
By doing so, you should be directed to Windows’ recovery options, analogous to what occurs when you attempt to boot into Safe Mode. However, on this occasion, proceed as follows:
- Navigate to Troubleshoot.
- Then, choose Advanced Options.
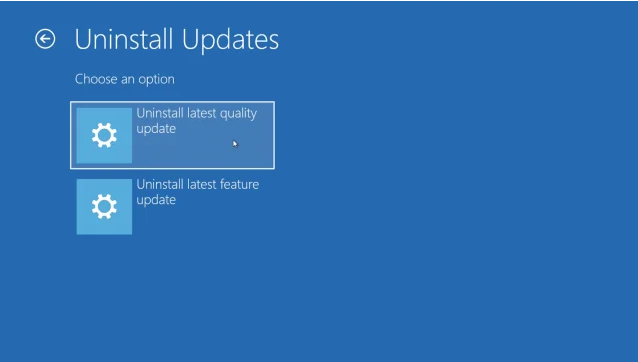
From here, select Uninstall Updates. This will present you with the choice of uninstalling the most recent Quality Update or Feature Update. This action should enable you to reboot into Windows safely once more. It’s worth noting that this method doesn’t present you with a list of recent updates as seen in Control Panel. Consequently, we advise attempting the steps outlined in the previous sections first. If all else fails, this recovery option serves as a last-resort measure.